Introduction
WordPress users who frequently upload large files, such as themes and images, can encounter the upload_max_filesize error. This error restricts your ability to upload files and prevents you from effectively managing and customizing WordPress websites.
This guide offers quick solutions for adjusting the relevant settings and resolving the file size error.
Prerequisites
- A working WordPress installation.
- Access to the server hosting the WordPress site locally or via SSH.
- A file manager or cPanel if working from a client system.
- A user account with sudo privileges.
- Access to a command line/terminal window.
What Causes the upload_max_filesize Error in WordPress?
The Uploaded file exceeds the upload_max_filesize directive in php.ini error in WordPress occurs when uploading large files, themes, or images.
A server-side setting in the php.ini configuration file, known as the upload_max_filesize directive, limits the size of files you can upload to the WordPress website. When the uploaded file size exceeds this limit, WordPress displays an error message.
WordPress provides a convenient way to check the current maximum upload file size:
1. Log in to the WordPress Dashboard.
2. Select Media and click Add New Media File.
3. Check the Maximum upload file size setting. In this example, the maximum file size is limited to 255 MB.

Steps to Fix upload_max_filesize Error in WordPress
The maximum upload file size setting cannot be changed through the WordPress dashboard. To change it, edit one of the following files on your WordPress server:
- php.ini. This configuration file controls PHP settings across the entire server. Adjusting PHP variables in the php.ini file is the most direct and effective way to increase file upload size limits.
- .htaccess. A plain text file located in a website's root directory. It contains various server directives and is primarily used with Apache web servers. If the server allows it, the .htaccess file can be configured to include PHP directives that increase the upload file size limit.
Hosting companies often limit the number of settings clients can edit. Depending on your hosting provider, you may be unable to implement the described solutions. In such cases, you need to contact your host's support. Most hosts adjust these configurations as part of their standard service.
Option 1: Edit php.ini
Increasing the upload_max_filesize value in the php.ini file applies the setting across the entire server, including the WordPress application.
Editing php.ini via cPanel
cPanel provides a user-friendly interface for managing server files from a web browser. To edit the php.ini file and increase the maximum upload file size for WordPress:
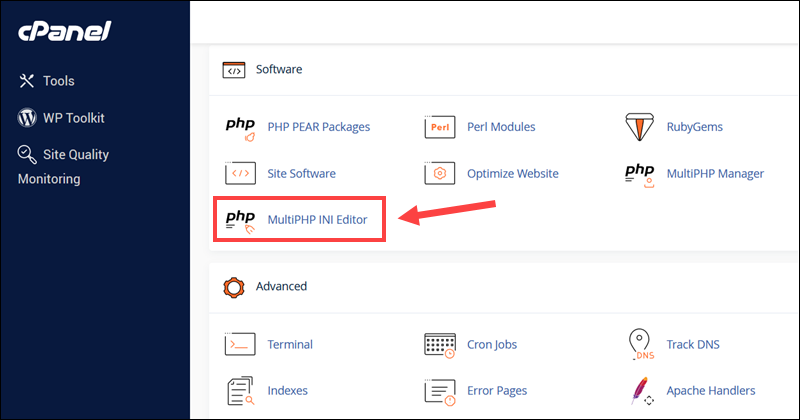
1. Log into cPanel.
2. Navigate to the Software section or search for a PHP configuration interface. In this example, the MultiPHP INI Editor enables users to configure PHP directives and directly edit the php.ini file.
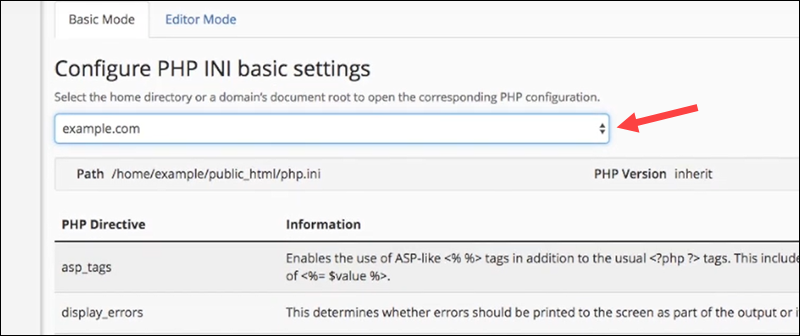
3. Use the dropdown menu to select the domain for which you want to make changes.
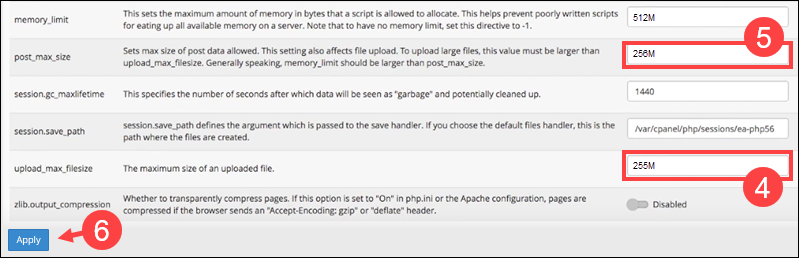
4. The interface displays the available PHP directives. Edit the upload_max_filesize setting and increase the value in megabytes. In this example, the value is set to 255M.
5. The post_max_size directive defines the total size of files uploaded in a single request. Adjust the post_max_size value to equal or greater than the upload_max_filesize value.
6. Click Apply to save the changes.
cPanel usually automatically applies changes to PHP settings. Check the Maximum upload file size value in WordPress and upload the file again to test if the error has been resolved.
Editing php.ini via FTP
If you do not have a hosting interface, you can use an FTP client, like FileZilla, to connect to the WordPress server and edit the php.ini file directly:
1. Connect to the WordPress server using the credentials provided by your hosting service.
2. The location of the php.ini file can vary depending on the server setup. On dedicated servers, it is usually in the /etc/php/ folder or a similar system directory. In a shared hosting environment, you might not have access to the global PHP configuration file but can often use a local php.ini file in the /public_html/ directory.
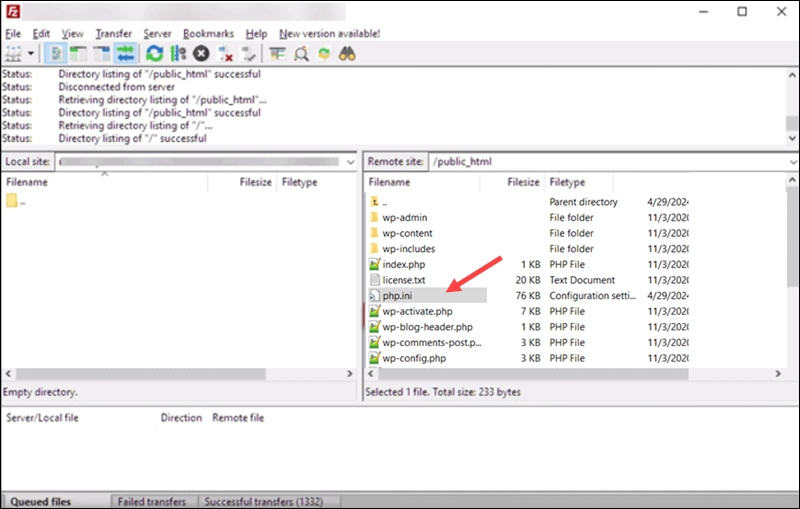
3. Download the php.ini file to the local machine and open it with a text editor like Notepad++.
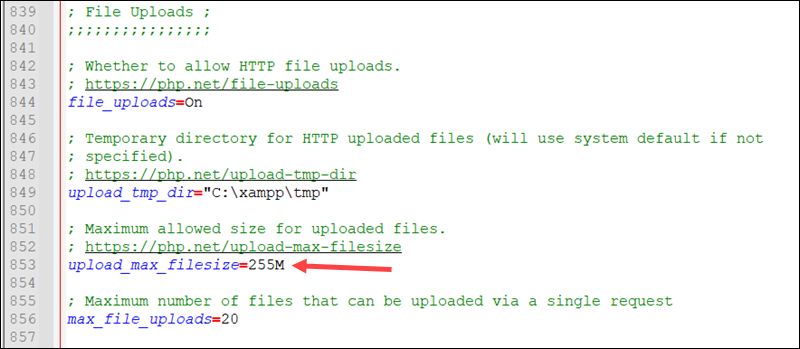
4. Find the upload_max_filesize line in the File Uploads section and change it to a higher value, such as 255M.
Note: Ensure that the post_max_size value in the php.ini file equals or exceeds the upload_max_filesize value.
5. Save your changes and upload the file to the server, replacing the original one.
Note: Remember to back up the original file before replacing it on the server to prevent potential data loss.
6. Restart PHP via the command line or your hosting control panel to ensure the changes take effect.
After the restart, attempt to upload the file to WordPress to confirm that the error has been resolved.
Editing php.ini via Command Line (SSH)
Users who do not have a graphical interface or prefer the command line (CLI) can edit the php.ini file by following the steps below:
1. Connect to your WordPress server via SSH.
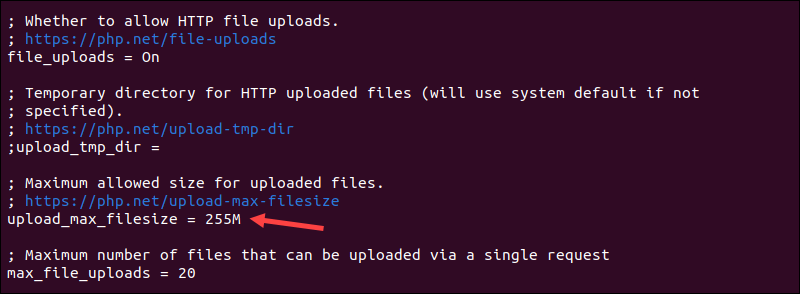
2. Use a command line editor like Nano or Vim to open the php.ini file. The path to the file varies based on server configuration. This example uses a common path for Apache servers:
sudo nano /etc/php/8.1/apache2/php.iniNote: If you are running a different version of PHP, replace 8.1 with the corresponding version number.
3. Locate the upload_max_filesize line and increase the value. In this example, the value is increased to 255M.
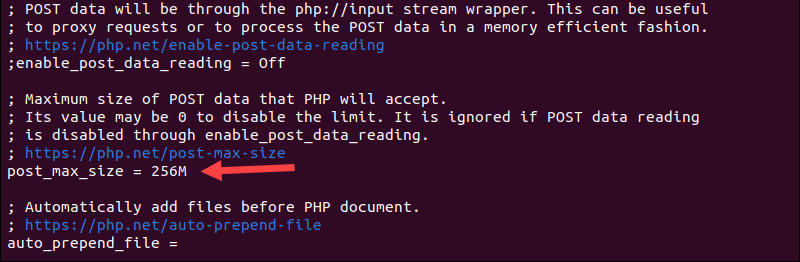
4. Adjust the post_max_size value in the Data Handling section to equal or higher than the upload_max_filesize value.
Save the file and exit.
5. To apply the changes, restart the Apache server using the following commands:
sudo systemctl restart apache2or
sudo service apache2 restart Upload the file that previously caused the upload_max_filesize error to confirm the issue with file size is now resolved.
Option 2: Edit .htaccess
The .htaccess file is a configuration file for Apache servers. The following section explains how to locate and edit the WordPress .htaccess file to alter server settings and increase the maximum file size limit.
Edit .htaccess via cPanel
To modify the .htaccess file through cPanel:
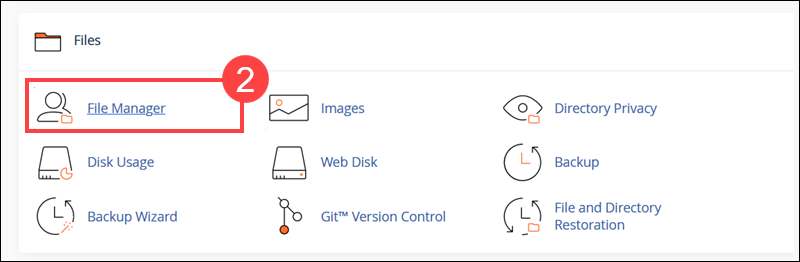
1. Log into the cPanel dashboard.
2. In the Files section, locate and open the File Manager.
3. Access the WordPress installation directory, usually www or public_html. If the .htaccess file is not immediately visible, it may be hidden.
4. To make the file visible, click Settings in the top right corner of the File Manager.
5. Check Show Hidden Files and click Save.
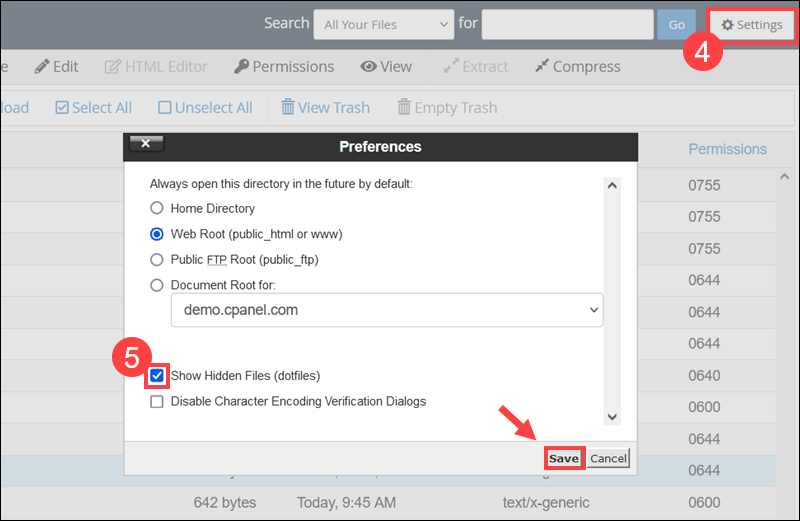
The .htaccess file is now visible in the current folder.
6. Select the .htaccess file, right-click, and choose Download to save a copy to the local machine.
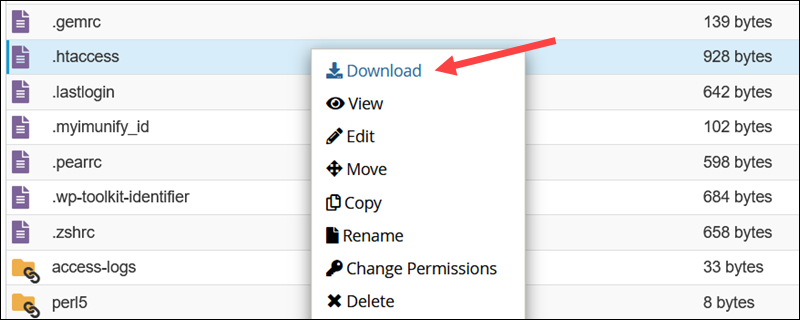
The saved copy serves as a backup in case of any errors.
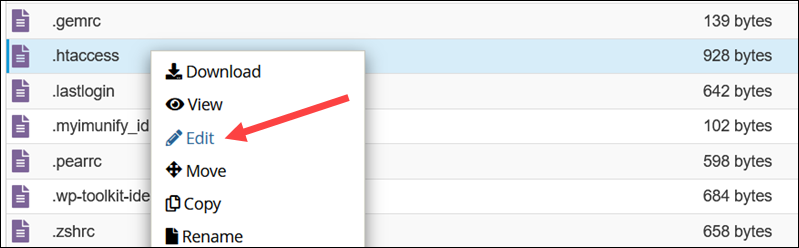
7. To edit the original .htaccess file, right-click the file and click Edit.
8. Add the following code to the .htaccess file:
php_value upload_max_filesize 255M

php_value post_max_size 256M

php_value max_execution_time 300

php_value max_input_time 300
This instruction changes the server-side limits, allowing you to upload files up to 255 MB.
9. Save the changes and exit the file.
Upload the file that previously caused the error to WordPress to verify that the error has been resolved.
Edit .htaccess via FTP
To modify the .htaccess file via an FTP client:
1. Use your FTP credentials to connect to the remote WordPress server.
2. Go to the WordPress website's root folder, usually named www or public_html.
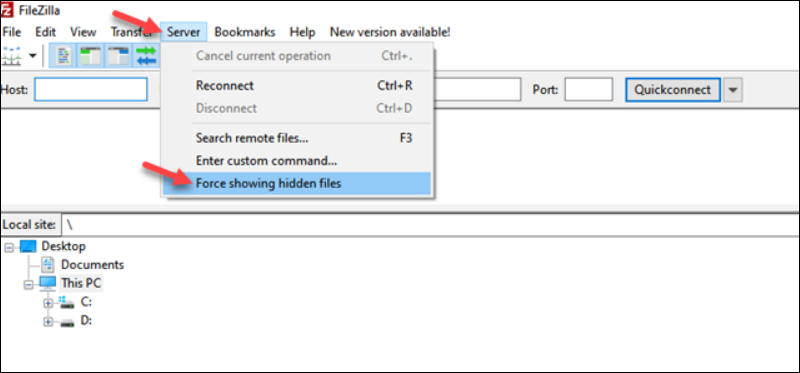
3. If the .htaccess file is not immediately visible, adjust FTP client settings to show hidden files. If using FileZilla, open the Server tab and select Force showing hidden files.
4. Right-click the .htaccess file and choose Download to save it locally. Keep an unedited copy of the original as a backup in case you need to revert the changes.
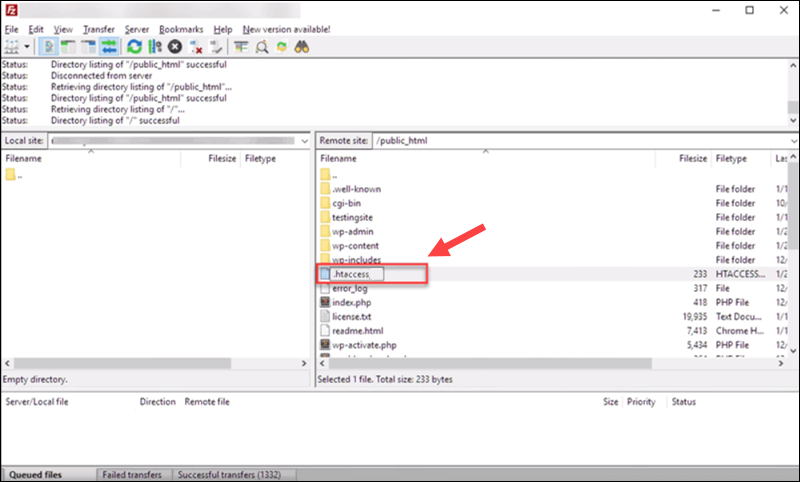
5. Open the downloaded .htaccess file with a text editor like Notepad++. Add the following directives to adjust PHP settings:
php_value upload_max_filesize 255M

php_value post_max_size 256M

php_value max_execution_time 300

php_value max_input_time 300
6. Save the changes and exit the text editor. Then, use your FTP client to upload the edited .htaccess file back to the server, overwriting the original file.
To confirm that the error has been resolved, try uploading the file that initially caused the error.
Edit .htaccess via CLI
To edit the .htaccess file via the terminal window:
1. Establish an SSH connection to the WordPress server.
2. Before making any changes, create a backup of the .htaccess file. The backup ensures you can revert to the original settings if something goes wrong. Use the following command to make a backup:
cp /path/to/wordpress/.htaccess /path/to/wordpress/.htaccess.bakNote: The /path/to/wordpress is an example. You need to enter the correct path to your WordPress directory.
3. Use a text editor, such as nano, to open the .htaccess file:
sudo nano /path/to/wordpress/.htaccess4. Edit or add the following lines to define the upload file size values:
php_value upload_max_filesize 255M

php_value post_max_size 256M

php_value max_execution_time 300

php_value max_input_time 300
This instruction changes the server-side upload file size limit to 255 MB.
Save the changes and exit the file.
Note: Check the .htaccess file permissions and adjust them using the chmod command if necessary.
Attempt to upload a file that meets the new size criteria to ensure the changes have been implemented effectively.
Conclusion
You have successfully fixed the The uploaded file exceeds the upload_max_filesize directive in php.ini error in WordPress. Regardless of the chosen method, following these simple instructions allows you to configure the maximum file size when uploading files to your website.
WordPress is a PHP-based platform, and learning about PHP error types and logging is an excellent way to prepare for potential errors in the future.
