Introduction
The diff command compares two files on a Linux system line by line. The utility prints the differences between files and suggests how to change the first file to match the second one.
These suggestions sometimes present a complicated output. One way to read the output efficiently is to colorize it with the diff --color command.
Read this tutorial to learn how to use diff --color to change the color of the output in Linux.

Prerequisites
- Linux system (this tutorial uses Ubuntu 20.04).
- Access to the terminal.
- Text editor (this tutorial uses Vim).
diff --color Syntax
The diff --color command syntax is:
diff --color <em>file1 file2</em>The diff --color command has nearly identical output to diff. Both commands print instructions on changing the first file by adding/deleting lines, and the output includes certain symbols and line numbers. The only real difference is that the diff --color command has a colorized output.
The diff --color output syntax consists of:
1. Symbols
The symbols are the same as for diff:
| Symbol | Description |
|---|---|
< | Placed before a line to be added or removed. Refers to the content in the first file. |
> | Placed before a line to be added or removed. Refers to the content in the second file. |
a | Add a line. |
c | Change a line. |
d | Delete a line. |
2. Line numbers
The diff --color output syntax includes lines with line numbers combined with a symbol. A single line always has a number referring to the first and a number referring to the second file. In addition, the numbers are always in that order.
For example:
3c5The syntax instructs the user to replace the third line from the first file with the fifth line from the second file because:
3. Refers to the first file and its third line.c. Is a symbol for change.5. Refers to the second file and its fifth line.
3. Colors
By default, the diff --color command highlights lines in:
- Green. The line to add to the first file.
- Red. The line to delete from the first file.
- Cyan. Lines representing line numbers.
How to Use diff --color to Change the Color of the Output?
The diff --color utility compares two files and prints lines unique for each file. Much like diff, the tool gives instructions on how to make files identical. The instructions are more intuitive and easier to understand because diff --color highlights lines that the user should add or remove to get two identical files.
Below are 7 practical uses for diff --color.
1. Add and Remove Text
The diff command scans for differences between two files and suggests changes in the form of added or removed lines. To test this, create two identical files, with a single different line of text.
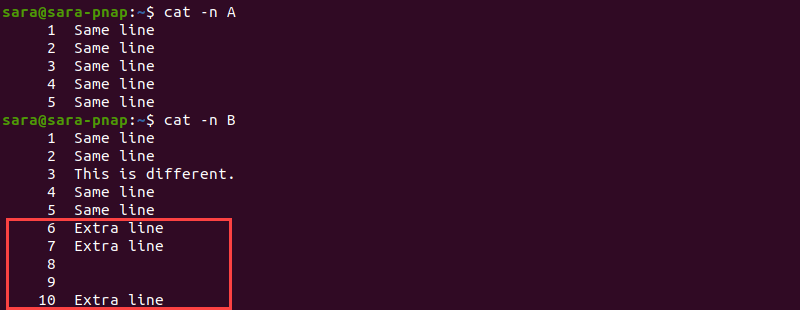
For instance, file A and file B are the same except for line three. Print contents of both files with line numbers with cat -n:
cat -n A
The A file has five lines, all including the "Same line" text.
cat -n B
File B also has five lines, but line three differs. Lines one to four include the text "Same line," while line three consists of the "This is different." text.
The diff command without arguments prints the following:
diff A B
The command shows the differences between files but also provides instructions on changing file A to match file B.
The instruction in the output is to replace (c) the third line (<Same line) from A (3c3) with the third line (>This is different) from B (3c3).
The files in the example differ in only one line. Still, understanding the output is not simple.
However, using diff with large files produces nearly impossible-to-navigate outputs. This is where diff --color steps in. The output is significantly easier to understand with the option to colorize the lines.
For example:
diff --color A B
While the symbols are the same, the colors instruct the user to delete the red line from file A and add the green line from file B.
2. Show Extra Lines
Use the diff --color tool to show extra lines. For instance, add a few additional lines to file B.
The output shows that B now contains five additional lines:
- Two empty ones (lines eight and nine).
- Three with the "Extra line" text (lines six, seven, and ten).
Run diff --color to see the differences:
diff --color A B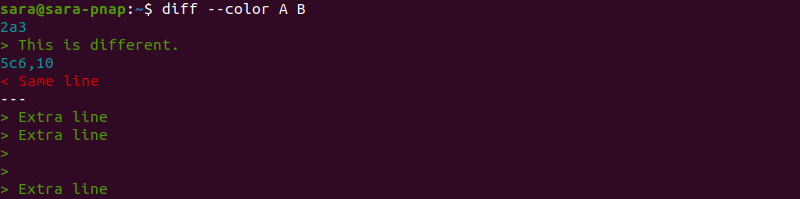
The output instructs the following:
- 2a3. After the second line in text A, add the third line from B (the green >This is different. line).
- 5c6,10. Replace the fifth line from A ( the red < Same line) with lines six to ten from B (all green lines).
3. Print Unified Output in Color
The --color argument is also compatible with some other diff options.
Without arguments, diff shows the output in the default format. The -u argument prints a unified output format without any unnecessary lines. The --color argument works well with -u and simplifies the output:
For example:
diff --color -u A B
The output includes:
- The first two lines with the name and timestamp of A and B
- File A is marked with
---. - File B is marked with
+++.
- File A is marked with
- The range for both files marked with
@@. - Changes:
- Keep white lines with no symbols the same.
- Add green lines with
+characters to A. - Delete red lines with the
-symbol from A.
4. Print Output in Colorized Context Format
The -c argument prints additional lines of context along with the standard output. The diff --color command is compatible with the context format. However, colors make the output in the context format more confusing instead of simplifying navigation.
For example:
diff --color -c A B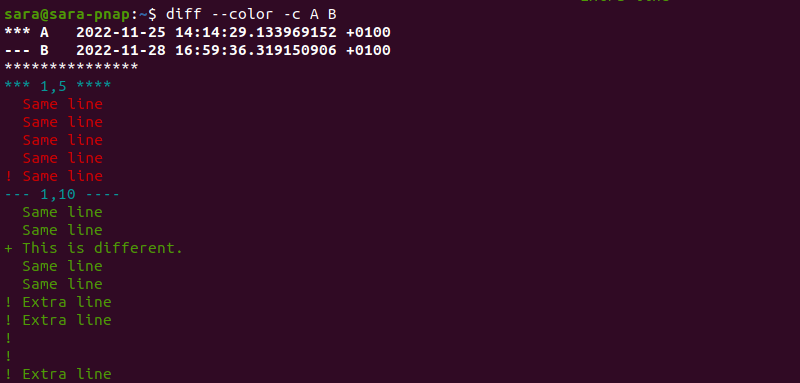
The output includes different symbols than the standard diff. The + sign instructs the user to add a line. The - symbol suggests deleting the line. The ! states that the line should be replaced.
However, the colorized lines contradict the context output. The output consists of:
- The first two lines show the name and timestamp of A and B.
- File A is marked with
***. - File B is marked with
___.
- File A is marked with
- A separator marked by
****************. - A line range for file A marking lines from one to five.
- Changes for A:
- Keep the first four red lines unchanged, as they are not accompanied by
-(contradictory to the--coloroutput). - Replace the fifth red line (
!) with a line from file B.
- Keep the first four red lines unchanged, as they are not accompanied by
- A line range for B from one to ten.
- Changes for B:
- Keep lines one, two, four, and five unchanged (contradictory to the green
--coloroutput). - Add (
+) line three to A. - Change (
!) lines six to 10.
- Keep lines one, two, four, and five unchanged (contradictory to the green
As shown above, there are inconsistencies between diff output syntax and colorized lines. Thus using --color with context format does not produce clear results.
5. Display Output in Two Columns
The -y argument prints diff output side-by-side. When used with --color, certain lines get colorized.
However, --color only works partially with -y. The command points to the lines to be added or deleted, not both. Moreover, --color does not affect the lines that the user is to change.
For example:
diff --color -y A B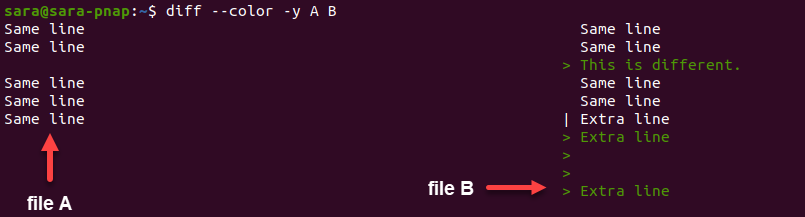
The output only highlights lines in green. Meaning that the command instructs the user which lines from B to add to A.
On the other hand, to see what to change in B (instead of A), switch the letters in the command:
diff --color -y B A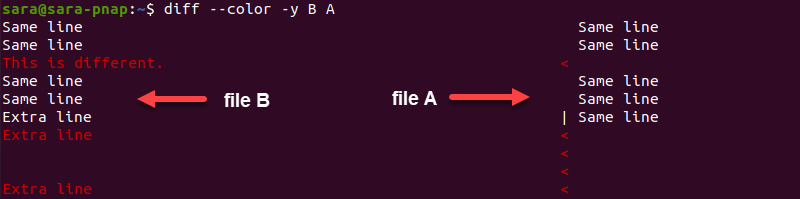
In this case, the command only shows red lines that the user is to delete from either file.
Note: The --color argument doesn't work with all other diff options. In some cases, the output is partially colorized, while in others --color is completely ignored.
6. Change Output Text Color
The diff --color command uses ANSI colors. ANSI's escape codes change the output color of specific commands.
To change the default diff --color output color, use:
diff --color --palette=':ad=[ANSI code]:de=[ANSI code]:ln=[ANSI code]' file1 file2The symbols represent:
:ad=[ ANSI code]- added lines.- :
de=[ ANSI code]- deleted lines. :ln=[ ANSI code]- line numbers.
ANSI codes include several segments. However, with diff --color, there is no need to use the entire code. For example, the ANSI code for red text is \u001b[31m. However, to change the color of a line to red with diff --color, the number 31 from the code is enough.
Below is a list of codes for basic ANSI colors:
| Color | Code |
|---|---|
| Black | 30 |
| Red | 31 |
| Green | 32 |
| Yellow: | 33 |
| Blue | 34 |
| Magenta | 35 |
| Cyan | 36 |
| White | 37 |
For instance, change the colors of:
- Deleted lines to yellow.
- Added lines to blue.
- Line numbers to magenta.
Run the command with the corresponding ANSI codes for those colors:
diff --color --palette=':ad=34:de=33:ln=35' A B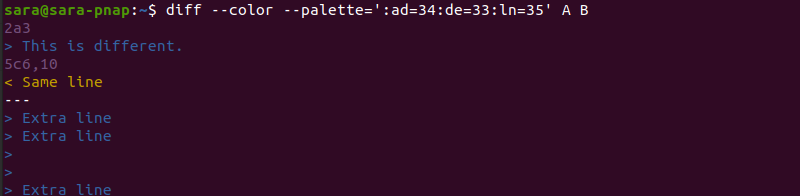
The output shows the changed colors.
7. Use the diff --color Output Permanently
To make the simple colorized diff output permanent, create an alias in Linux. An alias removes the need to always type the --color argument. That way, every time a user executes diff, the --color option applies by default.
The alias command adds a specific value to the command name:
alias [name]='[value]'For instance, to ensure diff --color always runs instead of diff, type:
alias diff='diff --color'The command prints no output. Verify the result by running diff with no arguments:
diff A B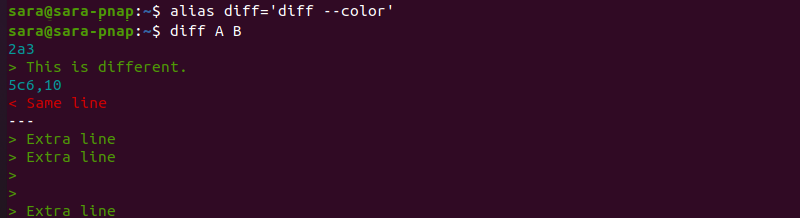
The command colorized the lines, which means that the alias works. Still, this change is not permanent and lasts only until the system reboots.
To make the alias permanent, edit .bashrc or bash_profile files. Changing the first file makes the alias permanent for the current user. Otherwise, the changes are permanent for all users.
This guide shows two ways to add an alias to the .bashrc file. The process is the same for bash_profile.
Append an Alias to the End of the File
1. Use echo to add the alias to the end of .bashrc without accessing any text editor.
echo "alias diff='diff --color' " >> ~/.bashrcThe command has no output.
2. However, use cat to print the .bashrc content and confirm the change:
cat .bashrc3. Scroll down to the end:

The echo command adds the alias to the script.
4. Verify the change is permanent by rebooting the terminal and running diff without --color:
diff A B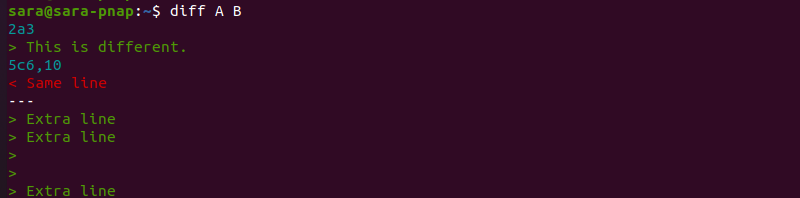
Change the .bashrc File with a Text Editor
Another way to make an alias permanent is to access .bashrc in a text editor. To accomplish that:
1. Access the file in Vim or another editor.
2. Go to the end of the file and add an alias to the end.
alias diff='diff --color'
5. Reboot the terminal.
6. Test the alias with:
diff A B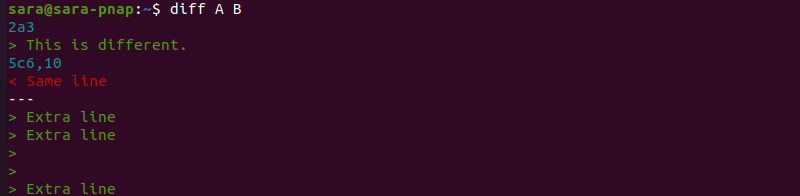
The output shows that even after a reboot, the change remains.
Conclusion
After reading this tutorial, you know how to use diff --color to colorize the distinctions between two files. The guide also reveals that reading the diff output is complex. Still, to find differences between files easily, read our guides on the Linux comm command.
