Introduction
Git stash temporarily and safely stores work locally when it is not ready to be committed yet. The stash command cleans up the working repository, reverting it to the last commit.
Stashing changes allows users to run other Git commands, such as checkout or pull, or to switch to a different branch without causing a mess on the main branch due to unsaved changes.
In this tutorial, you will learn to use Git stash through practical examples.

Prerequisites
- Git installed (see how to install Git on Ubuntu, macOS, Windows, CentOS 7, or CentOS 8).
- A Git repository.
What Is a Git Stash?
Git stash is a built-in Git command-line utility that locally stores the most recent, uncommitted changes and modified files in a workspace. The utility then resets the repository to a clean, last-commit state. It allows users to switch their focus to something else and later go back to working on the stored changes.
Stashing is also necessary because Git sometimes doesn't allow users to switch branches without committing changes they are working on. The reason for that is because the changes could be lost, or they may conflict with the branch you are switching to.
If you are not ready to commit the changes but need to work on something else, stashing the changes is the solution. The stashed files are stored locally, which means they cannot be seen by other developers sharing the same Git repository.
Note: Pushing changes doesn't replicate the stashed code to remote Git repositories.
How Does Git Stash Work?
Git stash works by storing modified files and code as commit objects in a special reference. The most recently created stash is stored in refs/stash, while any previous stashes are referenced by the reflog of the refs/stash reference.
A reflog or reference log records when the tips of branches and other references are updated in the local repository. The reflog syntax is:
stash@{index}When using the syntax, replace {index} with the reflog entry or commit ID for the stash ref. For example:
stash@{0}- The most recent stash.stash@{1}- The stash before the most recent one.stash@{d6849fb}- The stash specified by a unique stash ID.
git log --oneline --graph stash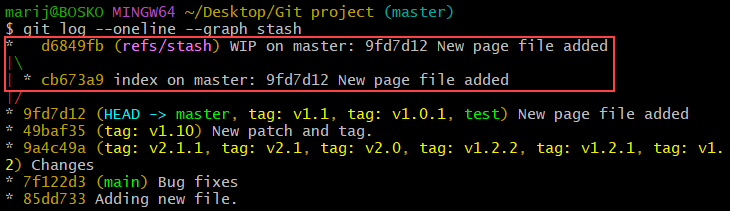
The command outputs all the stashes in the repository, each with its own ID, along with the stash tree structure. A stash can have multiple commits depending on the stashed contents. The stash tree contains:
stash@{0}- The commit that stores tracked files from the working copy.- The first parent - Records the commit existing at
HEAD. - The second parent - Records the state of the index. It is a child of the
HEADcommit. - The third parent - The commit that records untracked files from the working copy. This parent is created only if there were untracked files in the repository and if the
--allor--include-untrackedoption was specified when runninggit stash.
Running the git stash pop command uses the changes from the stashed commits to update the current working copy and index. The pop option removes the popped commit and shuffles the stash reflog:
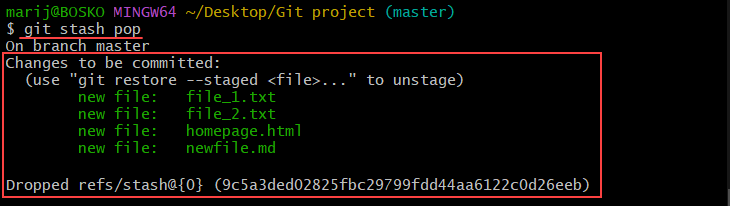
The command applies the changes to the working copy and schedules the stashed files for deletion. Alternatively, specifying the apply option instead of pop updates the working copy but keeps the changes in the stash.
For example:
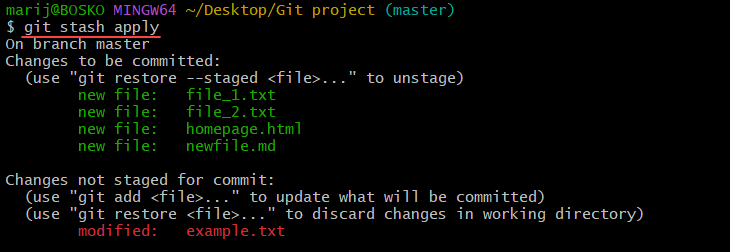
The command applies the changes and keeps them in the stash as well.
How to Use Git Stash?
Run the git stash command in Git Bash, a command-line interface for Windows, or any other Git interface on macOS or Linux. The following sections show different options available with git stash, each supported by examples.
Create a Git Stash
To create a Git stash and save your work, run the following command:
git stash
By default, the command stores uncommitted files and code while excluding any untracked or ignored files. It is usually unnecessary to stash untracked and ignored files unless they can interfere with future files in the workspace.
If you decide to stash untracked and ignored files, add the --all or --include-untracked option.
git stash --all
The command stashes all in-progress work, including untracked and ignored files.
Note: Remove untracked files in Git to improve efficiency and organization.
Create a Partial Stash
The --patch (-p) option allows users to stash specific file changes, creating partial stashes. Run the following command to create a partial stash:
git stash --patch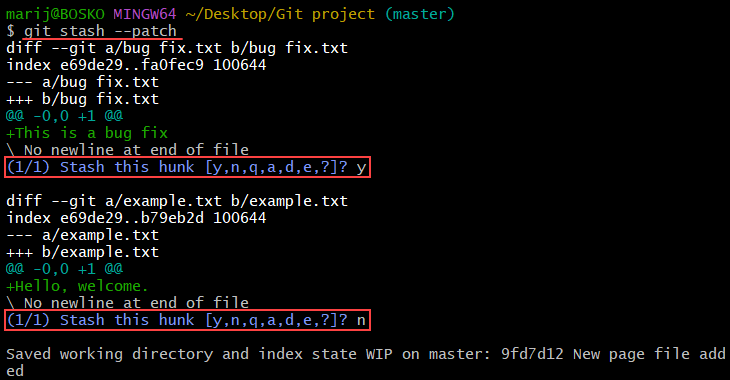
Passing the --patch option iterates through each changed hunk in the working copy, prompting for stashing each one individually.
- To stash a specific hunk, type y and press Enter.
- To skip stashing a hunk, press n.
- Abort the stashing by pressing Ctrl+C.
Note: It is not possible to select individual files, only changes in files, called hunks.
List the Git Stash Entries
View the existing Git stash entries using the list option. Run:
git stash list
The output shows a list of saved Git stashes in a chronological (LIFO - last-in-first-out) order.
Show the Stash Diffs
A stash diff is the summary of a stash. Use the following syntax to view a stash diff:
git stash show [stash_ID]For example, to view the stash@{0} diff, run:
git stash show stash@{0}
For a full, more detailed stash diff, pass the --patch option:
git stash show stash@{0} --patch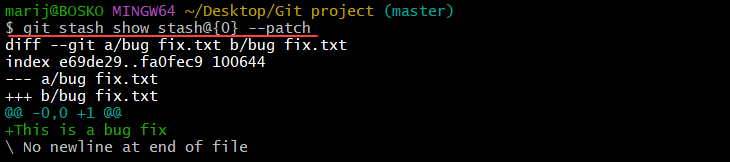
The command outputs the stash diff, index, and contents.
Note: Learn how to restore a Git stash.
Checkout to a New Branch
If there are discrepancies between the stashed code and the code in a working copy branch, Git may throw an error when you try to apply the stash. The solution to fixing the error is to create a new branch and apply the stashed changes to that branch. The syntax is:
git stash branch [branch_name] stash@{index}For example, to create a branch called test and apply the changes from stash@{2} to that branch, run:
git stash branch test stash@{2}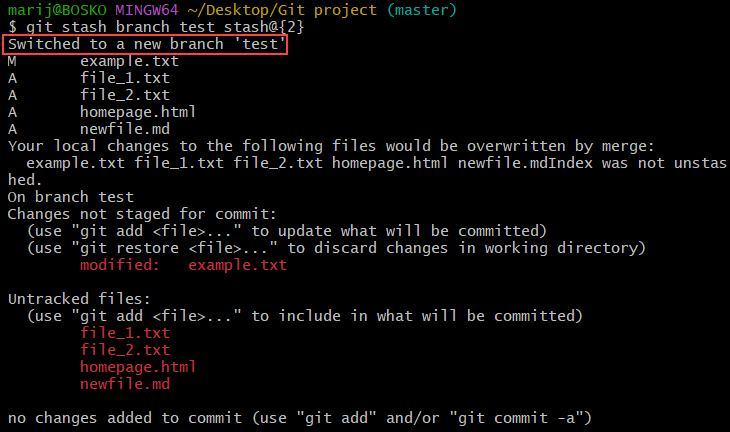
The command creates a new branch called test from the commit the stash is based on. It switches to that branch and applies the stash changes to the branch.
Create Stash Without Reference
If you want to create a stash without a reference log, use the git stash create command. The command creates a regular commit object and returns the commit ID without storing it in the ref namespace, keeping the reflog intact.
The new commit is called a dangling commit, which exists in the local repository, but no reference points to it.
Run the following command to create a dangling stash commit:
git stash create
After creating the stash, the commit ID appears in the output. If you decide to store it in the ref namespace and associate it with the cache ref, use the following syntax:
git stash store -m "message" [commit_ID]For [commit_ID], specify the commit ID from the git stash create command output. Optionally, add a name to the stash ref using the -m option. For example:

The command pushes the stash entry to the stash reflog, after which it appears in the stash list:

Clear Git Stash History
Use the clear option to remove all stash entries. Run the following command to remove all entries from the Git stash history:
git stash clearWarning: Running the git stash clear command schedules all entries for deletion. Once deleted, there is no way of recovering the entries.
Alternatively, use the following syntax to delete only a single stashed change from the ref:
git stash drop stash@{index}For example, to remove stash@{3}, run:
git stash drop stash@{3}
The output confirms that the specified stash was dropped.
Note: Read our tutorial and find out more on how to drop a git stash.
Conclusion
This guide showed how to create and use Git stashes. Git stash is an efficient and secure way to save a working copy of your repository without committing changes. For other Git tutorials, see our overview of basic Git tag functions, our guide for Git submodule, or learn to restore a Git repository.
