Introduction
Git tags serve as reference points in a project's development history. Use tags to mark a program release version, bug fix, patch, but also a specific commit. By tagging a particular commit, it is easy to revisit that certain point in development later and continue the development from there.
In this tutorial, you will learn to create a Git tag for a specific commit.

Prerequisites
- Git installed (see our tutorials for installing Git on Windows, macOS, Ubuntu, CentOS 7, or CentOS 8).
- A Git repository.
Create a Git Tag for a Commit
Follow the steps below to create a tag for a specific commit:
1. Track Files
After making changes to existing files or adding new ones to the repository, add all files to the staging environment by running:
git add .2. Create Commit.
Create a commit using the git commit command. The syntax is:
git commit -m "Notes about the commit"For example:

3. Create Tag
Create a tag for the last commit by specifying the HEAD in the git tag command. Referencing the HEAD enables users to create a tag for the latest commit without specifying the commit's exact SHA hash.
Lightweight tags are suitable for internal use, while annotated tags are used for public releases as they contain additional metadata.
The syntax to create an annotated tag for the last commit is:
git tag -a [tag_name] HEAD -m "Tag message"For example:
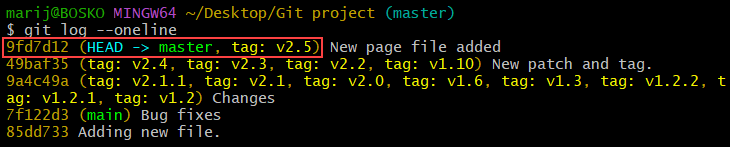
git tag v2.5 HEAD -m "Version 2.5 released"Running the git log --oneline command shows that the v2.5 tag was created for the latest commit:
4. Sync Changes with Remote
Use the following syntax to push the new tag to the remote repository:
git push [remote_name] [tag_name]For example:
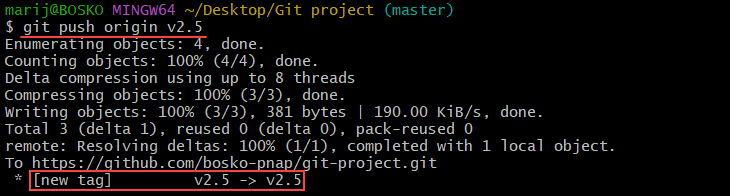
The command pushes the v2.5 tag to the origin remote repository. Alternatively, export all local tags to the remote repository by running:
git push origin --tagsCreate a Git Tag for an Old Commit
Create a Git tag for an earlier commit in Git history by specifying the commit's SHA hash. Follow the steps below to create a tag with the current date or matching the commit date.
Create Tag With Current Date
1. Obtain Commit SHA
Use the --oneline flag with git log to obtain the commit SHA value:
git log --onelineThe --oneline flag outputs the repository log with a short SHA code for each commit:
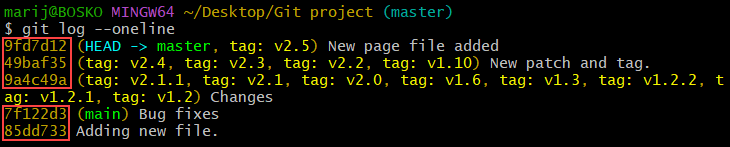
Copy the SHA value for the commit you want to create the tag for.
2. Create a Tag
Use the following syntax to create an annotated tag:
git tag -a [tag_name] [commit_SHA] -m "Notes about the tag"For example:
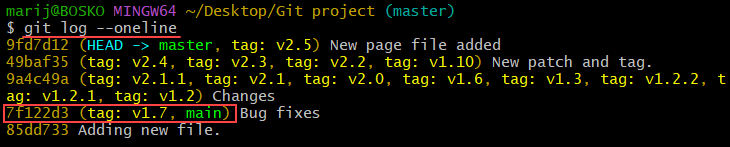
git tag -a v1.7 7f122d3 -m "Hotfix released"The command creates a tag named v1.7 for the specified commit. Rerun git log --oneline to check:
Although the tag is created for an old commit, the command creates tags with the current date and shows that value on a GitHub releases page.
Create Tag Matching Commit Date
Follow the steps below to create a tag dated the same as the commit date:
1. Obtain Commit SHA
Obtain the commit SHA by running:
git log --oneline2. Checkout to Old Commit
Set the HEAD to the old commit. Use the following syntax:
git checkout [commit_SHA]For example:
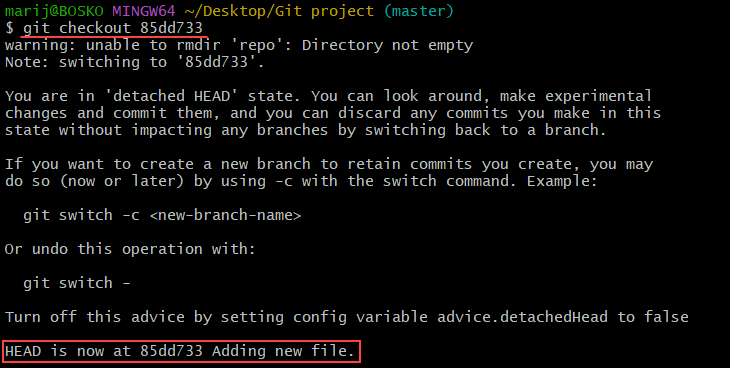
The command switches the HEAD to the specified commit, resulting in a detached HEAD state. This state occurs because it is in the middle of the commit history and making changes can disturb the Git blockchain. The same happens when cloning a Git tag or when you checkout a Git tag.
3. Change the Date and Add Tag
Temporarily set the date to match the HEAD commit date:
GIT_COMMITTER_DATE="$(git show --format=%aD | head -1)" \Create the tag using the following syntax:
git tag -a [tag_name] -m "Tag notes"
4. Export Changes
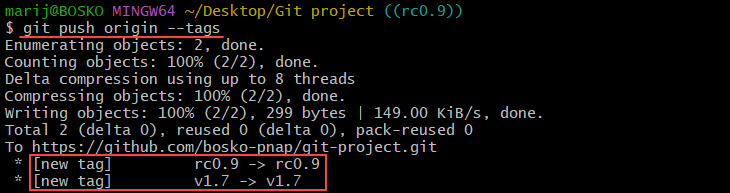
Push the changes to the remote repository. The syntax is:
git push [remote_name] --tagsFor example:
5. Switch HEAD Back to Master
Switch back to the master branch or any other branch using the git checkout command. To switch back to master, run:
git checkout master
Conclusion
This tutorial showed how to create a Git tag for the latest commit and for a specific commit in Git project development history. The guide also shows how to set the tag creation date to match the commit date.
For more Git tutorials, see how to clone a Git tag, delete a Git tag, or rename a tag in Git.
